Drying Wings
DRY TIME
24-48 hrs
METHOD
Fridge, Uncovered
DIFFICULTY
Easy
The difference between average Buffalo wings and great Buffalo wings often comes down to texture. Prepared incorrectly, the skin can end up rubbery or the meat can become tough and dry.
In my experience, the problem can usually be traced back to two things.
Oil Temperature: When frying, the required oil temperature is not maintained. Many fryers start hot enough but struggle to maintain temperature after cold wings are added. Oil temperature will be covered in exhaustive detail in the Frying Wings article.
Wing Dryness: Wings are not dry when they go into the fryer. Drying wings is another simple way to improve texture and create crisp skin without drying out the meat.
How to Dry Wings
How long should chicken wings dry in the refrigerator?
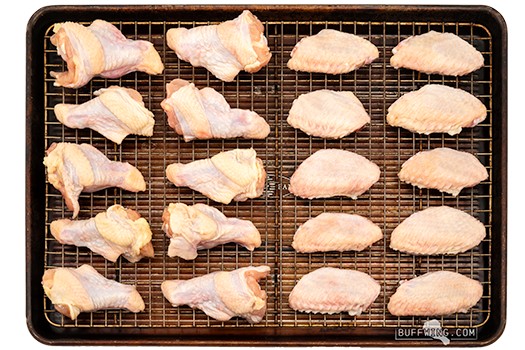
For the best results, leave chicken wings uncovered in the refrigerator for 24 to 48 hours. Less time may not dry the skin enough, while too much time can make the skin leathery.
- Season the wings: I recommend 1/2 tsp kosher salt or 1/4 tsp regular table salt per pound of wings. Salt improves flavor and works well with the drying process. See the wing seasoning article Here.
- Spread them out: Place wings on a wire rack over a baking sheet. Avoid crowding; they need airflow on all sides.
- Refrigerate: Take precautions to prevent raw chicken from contaminating other foods, including keeping the tray on the bottom shelf of the refrigerator.
- Let them dry: Leave the wings uncovered for 24 to 48 hours.
Danger Zone
What is the danger zone? It’s the temperature range between 40°F (4°C) and 140°F (60°C) where bacteria are happiest and reproduce quickly. Raw chicken should stay out of this range as much as possible. In general, wings should either be in the refrigerator or in the fryer.
Don’t panic, you have some time. According to the USDA, you generally have about 2 hours to work with raw chicken while it is in the danger zone, or about 1 hour in temperatures above 90°F (32°C).
When drying wings, store raw chicken on the bottom shelf and sanitize surfaces that come into contact with the chicken during preparation, drying and frying. This includes countertops, trays, wire racks, utensils, refrigerator surfaces and even the sink.
Controlling Humidity
Drying time depends heavily on your refrigerator conditions. A brand new refrigerator in a dry climate with very little inside will not have to work as hard as an older refrigerator in a humid climate that is packed with food and constantly being opened.
Your refrigerator’s airflow and ability to remove moisture will absolutely affect drying time. If wings don’t appear to get any drier after 24 hours, you may need to make some adjustments.
You can use a hygrometer to monitor the humidity in your refrigerator. You can find a link to the one I use in my Buffalo Wing Kitchen Tools article. It’s inexpensive and connects to an app on your phone via Bluetooth, allowing you to monitor humidity without opening the refrigerator door and letting more humidity in.
Lower humidity generally means faster drying. Around 40% humidity seems to work very well for drying wings. Once humidity climbs above 60%, drying slows noticeably.
Don’t worry too much if the humidity shoots up after adding the wings. They are wet, so that is normal. The humidity should slowly drop as the wings dry.
Things You Can Do to Reduce Humidity
- Seal or remove moisture-heavy foods like soups and uncovered vegetables. Keeping these foods in the bottom drawers should also help reduce humidity.
- Defrost the fridge ahead of time. Refrigerators, even new ones, benefit from occasional defrosting to help remove moisture.
- Consider adding a padlock to the refrigerator door so family members are unable to disrupt the very important business.
Why Drying Works
Why does drying wings improve Buffalo wings? When done right, drying allows the fryer to crisp the skin while the skin protects the meat underneath from overcooking and drying out.
Removing Water
This may seem obvious but drying wings removes water mostly from the wing’s outer layer, otherwise known as the skin, before the wings ever hit the oil. This gives the fryer a head start and helps crisp the skin without extra time in the oil that could overcook and dry out the meat underneath.
Obviously there is a lot more happening during frying than just water removal. Fat is rendering, proteins are changing and all kinds of other reactions are taking place. For those interested, very nerdy wing science articles are coming in the future. For now, understanding water and skin texture is what matters most when it comes to making better Buffalo wings at home.
Skin Protection
Wet chicken skin is loose and floppy in the fryer, allowing hot oil to move around underneath more easily.
During the drying process, the skin shrinks and tightens against the meat underneath. At the same time, moisture trapped between the skin and meat condenses and starts acting like a glue, helping the skin cling more tightly to the meat. This prevents oil from getting underneath the skin.
You can actually see the difference. Before drying, the skin hangs loosely from the wing. After drying, it tightens against the meat and naturally clings in place.
The skin acts as a protective barrier between the hot oil and the meat, helping keep the meat moist and juicy while the outside crisps.
What Good Texture Looks Like
Honestly, I’m not sure I can fully articulate what perfect texture is supposed to be. It’s more of a spectrum we want to stay within.
For me, the perfect crisp skin looks (or sounds) something like this. I want to hear a crunch as my teeth bite into and tear through the skin of a hot Buffalo wing. The skin should be light and airy with tiny blisters and bubbles that create crispness without becoming tough.
There are good and bad ends of that range. On one side: undercooked, rubbery skin with no crisp at all. On the other side: skin that is unpleasant because it is dense and more like fried cardboard. Even if it is dry and crunchy, if it becomes hard to bite through or difficult to tear, it has gone too far.
Drying Wings at Scale
Drying wings at scale at home creates problems restaurants rarely have to think about. Commercial kitchens often have dedicated refrigeration, more airflow, more space and equipment designed for food production. At home, you are trying to dry trays of chicken wings in the same refrigerator your family opens every five minutes looking for juice.
My wife loves coming home to find the entire fridge compressed onto the top shelf while the middle and bottom shelves are filled with racks of chicken wings. Eventually, I came up with a solution.
Some people have kegerators, wine fridges or cigar humidors. I have a Buffalo wing drying fridge and I’m proud of it!
Pro Tips
- Watch for condensation: Cover wings with plastic wrap or place them in a zipper bag after removing them from the refrigerator and before frying. This prevents condensation from forming on the skin and reducing the benefit of all your drying efforts.
- Dry wings are also less likely to stick to fryer baskets and baking trays.
- Water and hot oil don’t mix: The wetter your wings are, the more splatter and overflow risk you create during frying. More on this in the Frying Wings article.
- Short on time? Do your best to get the wings as dry as possible before frying. Paper towels work well. At the very least, wings should never be wet enough for water to drip off when dropping them into the fryer. Water can be dangerous in hot oil!
Drying Skin is Not a New Idea or Unique to Buffalo Wings
Drying poultry skin before cooking is not unique to Buffalo wings. Peking duck is another famous example of skin preparation being critical to texture and has reportedly been prepared this way since the 1300s. Different methods are used, but the goal is similar: dry the skin enough for it to become thin and crisp during cooking.
The same basic principle shows up in everyday cooking too. Many chicken recipes suggest drying skin-on thighs, breasts and drums before broiling or grilling to help crisp the skin.